- March 20, 2017
- Posted by: tools
- Category: Articles

Setting up a stamping die is one of the most critical steps in a successful stamping process. It’s a fact: More damage is done to a die, especially a progressive die, in the first 10 hits than in the next 10,000 hits.
To reduce the number of mistakes, it is important to have a good die setup recipe for each progressive tool. The special setup sheet should contain numerous items in checklist form.
Setup Checklist
All of the following items are crucial to your die-setup recipe. Although some of these items may seem very obvious, do not make assumptions that they will be performed automatically.

1, Material thickness, type, mechanical properties- Verify the metal thickness, and, when possible, verify that it is the right type to be used in the die.
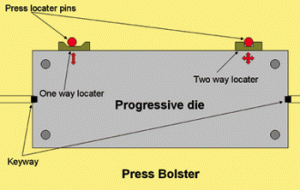
2, Die placement- Make sure that the die is set so that the material feeds parallel to the tool. Parallel feed can be achieved several ways, such as stop pins, keyways, and conical locaters. Figure 1shows stop pins and keyways.
Only one type of locater is necessary. Avoid “sighting in” the tool as this process is difficult to repeat and inaccurate. When possible, try to place the center of the estimated tonnage in the center of the press and not the centerline of the die in the center of the bolster.
3, Shut height- Ensure that the shut height of the die is set correctly. Avoid using press counters to establish the finish shut height. Avoid hitting setup blocks. Because a press defects, it may be necessary to calibrate the finished shut height after the die is fully loaded.
4, Lubrication- Verify the type of lubricant to be used, the application method, and the mixture ratio. Don’t forget that it is important to lubricate both sides of the material correctly.
5, Coil quality- Check coils for defects. Avoid running rusty or dirty stock through the tool because this can cause die damage, as well as defective parts. Figure 2shows various coil surface defects.
6, First-hit line- This is a very important step and requires careful attention. Starting the material in the wrong spot can cause half-hits of half-forms. Unbalanced cutting or forming can cause the upper and lower dies to misalign and shear. Also, incorrectly starting the material can leave loose scrap in the die. If the scrap is not removed, double metal results and is fed into the tool. This condition can cause severe die damage. A good die designer establishes a distinct first-hit line by placing a positive spring-loaded stop at this point, rather than a simple line with a message: Start strip here.
7, Bolts and fasteners- Double-check all of the bolts securing the die in the press, making sure that they are tightened and secure. Make no assumptions. Despite the fact that this seems obvious, it still helps to have a checklist reminder.
8, Sever-edge camber- Check for sever-edge camber in the coil. Severely cambered material will be difficult to feed through the dies. Figure 3shows the process for checking for camber. The general standard for camber is that it be no more than 1/4 in. per 8 ft. of coil. The ratio can be measured easily using an 8-ft. piece of string and a scale.
9, Feed acceleration, timing- Properly time the acceleration and deceleration of the stock-feeding system, and set the optimal time to feed.
10, Counterbalance- Make sure the press counterbalance pressure is set properly with respect to the upper-die weight. Not doing so can cause poor ram-to-bolster parallelism, unnecessary press loading, as well as excessive wear, die shearing, a tonnage loss, and a press energy loss.
Haste Makes Waste
Neither the process of setting up dies nor should the tremendous responsibility of a die setter should be taken lightly. Tooling cost often is enormous, and one simple mistake can cost thousands of dollars. Try creating a simple checklist of critical items, and then take the time to check them off manually during the die setup procedure. Take nothing for granted, make no assumptions, and keep accurate records of each tool set’s parameters.
